

For those who only drive the old family sedan around town, there’s a lot that goes into fine-tuning a race car to deliver its best performance. Performance settings will be tweaked, and engine components will be replaced depending on the race day environment. Braking systems will be double-checked, aerodynamic features aligned, and tires will be changed depending on track conditions. To put it simply, it takes a lot of effort to go fast.
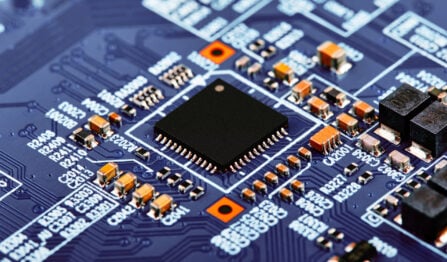
The circuit boards we design also require extra effort when laying them out for high-speed circuitry. Sensitive nets must be routed according to specific high-speed rules and many other high-speed design requirements that must be followed. These include everything from how the schematic is organized to the placement of the components. We will look at all of this as we discuss the high-speed routing techniques to help you cross the finish line with your next PCB design.
High-Speed Design Considerations Before You Get to PCB Layout

Routing high-speed circuitry successfully requires a lot more preparation than what you may use on a standard circuit board. Signal paths, controlled impedance routing, and EMI have to be considered in a high-speed design while balancing the board’s usual fabrication and assembly needs. It’s essential to start your preparation before the layout even begins to keep all of these needs organized:
- Schematic: The first thing you can do to help your high-speed routing is to start with a clean schematic. There should be a logical flow of the high-speed circuits that are easy to follow during the PCB layout. Any instructions for layout personnel should also be communicated so that there isn’t any confusion later.
- Board layer stackup: High-speed routing often requires stripline or microstrip layer configurations. This provides shielded layers for sensitive trace routing that will help guard against EMI problems and preserve the signal integrity of the circuitry. Stackups should be agreed on with your PCB contract manufacturer before layout starts to give you a foundation to work with and ensure the board’s manufacturability.
- Design rules: In addition to the standard trace width and spacing rules, there will be a whole new set of high-speed design rules and constraints. These will include specific net classes, differential pairs, trace lengths and topologies, and impedance controlled routing rules. There may also be specific requirements for blind and buried vias, microvias, and other high-speed constraints.
Once these items have been checked off your to-do list, you will be ready to begin the PCB layout.
Place and Route Tips for High-Speed PCB Designs
While there are plenty of high-speed routing techniques to discuss, the first topic to explore is component placement. Good routing begins with good component placement, and that is true whether or not the board is a high-speed design.
Component Placement
Use standard component placement methods, to begin with, starting with connectors and large CPU and memory devices. To get the best signal path as you continue to place the parts, follow the schematic’s logic flow. Many more considerable CPU and memory devices will require a lot of bypass capacitors, so make sure to place these right away, or you may not have enough room for them later. While you are placing, remember to preserve space for routing channels and vias throughout the board layer stackup. In addition to the high-speed requirements, also remember your placement still needs to adhere to design for manufacturing (DFM) rules and give consideration to the thermal needs of parts that run hot.
Escape Routing
Now you are ready for routing, but you need to first create escape routing for all of your fine-pitch devices before you start laying in traces. If you are working with large scale parts such as BGA packages with hundreds or thousands of pins in them, each pin can be accessed for routing. This accessibility is usually accomplished by routing diagonally out of the outer rows of pins to vias.
For the next rows of pins, it is common to use a very short trace to a via between the BGA pads known as a dog-bone pattern. If the BGA pin pitch is too fine, however, you may need to use via in pad technology, microvias, or both, but be sure to get sign-off from your manufacturer on these PCB technologies first. One helpful hint here is that component manufacturers often provide recommended routing patterns for their parts, so be sure to check there to save yourself some time.
Trace Routing
With the escape routing done, it is now time to route the rest of the board. This routing can be done manually, with auto-interactive routing tools or batch-routing tools, if you have the design rules set up sufficiently. Whichever method you use, here are some points that you should keep in mind to ensure the success of your routing:
- High-speed signal paths must be kept short and routed from point to point.
- Sensitive traces should be routed on internal layers where they are sandwiched between reference planes in a stripline configuration.
- Differential pairs must be routed together as a pair. Use your design system’s automated features for routing these traces, and make sure that the pairs are not interrupted with vias or other obstacles between them.
- For groups of nets that all have to be matched in length, start with the longest connection. For the remainder of the nets in the group, add tuning features to each trace to match the first net routed to end up the same length. Tuning is usually done by adding waves or trombone topologies to the trace to lengthen it and is typically done automatically by the CAD tools.
- Do not route sensitive digital lines through noisy power supply or analog areas of circuitry.
Power and Ground Planes
Designing a clean power distribution network (PDN) for a high-speed board is critical to the design’s overall success. High-speed components will create more noise on the board due to their switching rates, controlled with bypass caps. It is also important to remember that the ground planes will be used as reference planes for signal returns. Be careful not to route sensitive traces where these signal return paths are blocked by a dense via placement, board cut-outs, or split planes, as this will degrade the signal integrity of those traces.
As you can see, high-speed routing is more than just laying down a few unique traces on a board. Many aspects of PCB layout must be done with the routing to complete a high-speed design. And as we initially stated, it all starts with correctly setting up the board with your PCB contract manufacturer before the layout even begins.
Work with Your PCB CM for the Best High-Speed Routing Techniques
While older PCB designs could often be made to work by retrofitting a board layer stackup to the layout, a high-speed design should start with a stackup explicitly configured for it. Although PCB designers are usually familiar with different board layer configurations, many other variables need to be considered for high-speed designs. These include board materials, controlled impedance routing, layer pairs, and assembly processes. The best thing you can do is first consult with your PCB contract manufacturer to ensure that you are working with the most optimum layer configuration possible for your design.
At VSE, we have been working with PCB designers like you for over 30 years. Our team of design engineers fully understand the intricacies of circuit board fabrication and assembly, as well as high-speed PCB design engineering. We are ready to help you with your board layer configurations, as well as any other questions or concerns you have about your next high-speed PCB design.